|
|
First steps |
|
How to write, initialize and run a program |
|
|
|
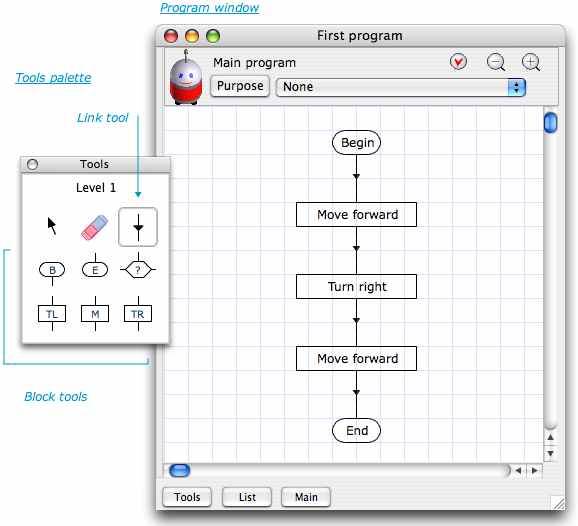
Launch RobotProg : you see two windows : the program window where you are going to draw the programme flowchart and a palette containing tools to draw the flowchart. *
Write the flowchart. |
|
|
|
|
|
A flowchart must contain one begin block and only one to show where the program begins, and one or more end blocks |
|
|
|
|
|
|
|
|
*
Program initialization :
click INIT button or choose Execution > Initailization
menu. * Run the program : click the Run button or choose Execution > Run menu. |
|
Moving the robot |
|
|
|
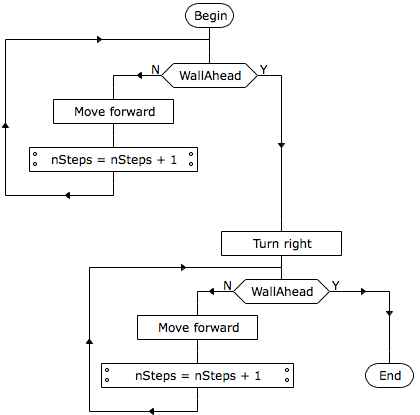
There
are three commands to move the robot : MoveForward,
Turn right and Turn
left |
|
|
-
Close previous program window and choose File > New program
menu. |
|
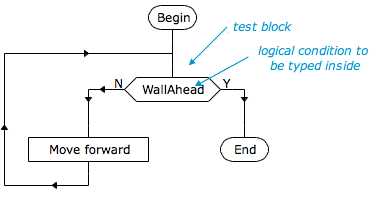
Tests and logical conditions |
|
|
|
-
Close previous program window and choose File > New program
menu. |
|
|
*
Programming
a
test
:
|
|
|
To change the text inside a test block, choose select tool and double click the block. |
|
|
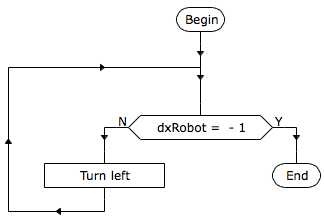
The
logical condition inside a test block is evaluated when the block
is executed. The result is either true or false . If the result is
true, the execution continues at the block following the Y exit (Y
is for Yes or true) ; if the result is false, the execution
continues at the block following the N exit (N is for No or false
) |
|
|
*
Step by step execution and current state display . |
|
|
*
Logical conditions |
|
|
In
this exercise, you are going to reach the purpose "Go to a
corner" |

|
|
Simplier is easier |
|
Why subroutines ? |
|
|
|
Often
a program is written to solve a problem which may be very
complicated. So it is necessary to analyze the problem and to
divide it into simplier and more elementary problems. Subroutines
allow the programmer to separate the program into smaller parts
which are easier to solve. A subroutine can be called many times
in the same program, thus avoiding to repeat the same code at
various places in the program. |
|
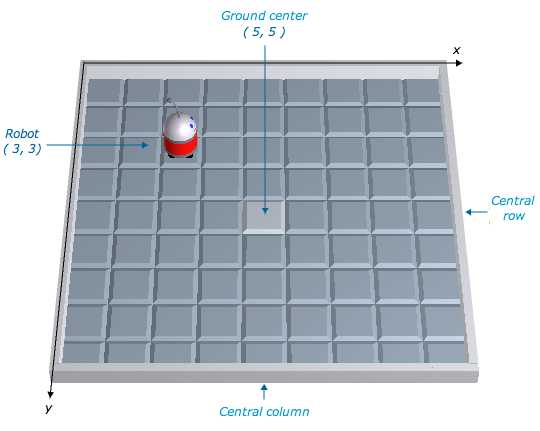
Robot position and direction |
|
|
|
|
|
A ground tile position is given by its coordinates x, y. x and y are positive integer. The rear left tile coordinates are 1, 1. The rear right tile coodinates are 9,1 in the example above. |
|
|
|
*
Robot position : |
|
|
*
Robot direction : |
|
Ground modification |
|
|
|
The
ground may be edited except during a program execution. |
|
|
Now,
you are going to built the ground which will be used in this
tutorial. |
|
|
With the ground modification window, you can add or remove walls and energy sockets. You can also save and open ground files. The ground edited above has been saved in the file Ground9x9.bog inside the file folder of the tutorial. |
|
|
- Click on Use this ground button to close the ground modification window. Now, if you display the ground with the Window > Execution window menu, you see the new ground. |
|
Create a subroutine |
|
|
|
*
Here, you are going to build a subroutine to turn the robot
towards the left of the ground. |
|
|
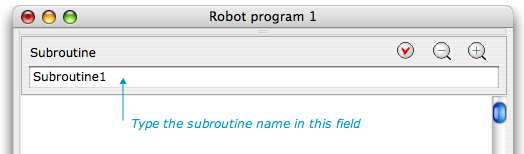
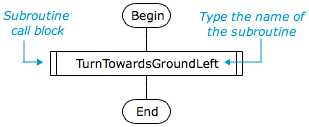
* Subroutine name : each subroutine is identified by the name you assign to it. By default, when the subroutine is created, it gets the name Subroutine1. Replace this name by TurnTowardsGroundLeft |
|
|
|
|
|
A subroutine name may contain letters and digits but no space and must begin with a letter. Its maximum length is 32 characters. It must be different from the robot language keywords. |
|
|
*
Build the TurnTowardsGroundLeft
subroutine flowchart
: |
|
|
|
|
|
You can verify that the flowchart is correct by clicking the Verify flowchart button in the subroutine header. |
|
Main program and subroutines display |
|
|
|
*
Main program and subroutines list : click button List at the
bottom of program window to display (or hide) this list. The list
appears at the left of the program window. The first element in
this list is the main program. It has the same name as the window
and the file (in case it has been saved). |
|
Call a subroutine |
|
|
*
A subroutine is executed when it is called from main program or a
subroutine. This is done by inserting a subroutine
call block
into the flowchart. |
|
|
|
|
|
|
*
Subroutine
execution :
a subroutine call block execution causes the execution of the
subroutine begin block, then the subroutine is executed until its
end block, then the execution continues at the block following the
subroutine call block. |
|
|
Build and test a new subroutine named TurnTowardsGroundRight |
|
The robot goes to the ground center |
|
|
|
*
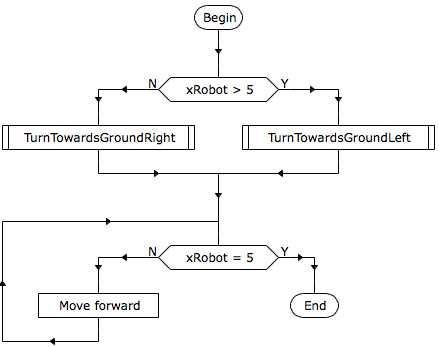
The ground center is at the intersection of the central column and
the central row (see the
ground). |
|
|
|
|
|
The abscissa (x) of central row tiles has the value 5. If the robot position xRobot is smaller than 5, we rotate it so that it becomes oriented towards the ground right, otherwise we rotate it towards the ground left, then we make it move ahead until it reaches the central row. |
|
|
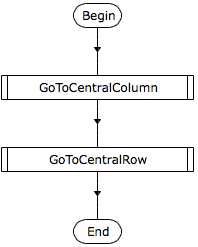
- in main program, insert a GoToCentralColumn subroutine call and run the program to test the subroutine |
|
|
* GoToCentralRow subroutine : |
|
|
This
subroutine method is similar to the previous one, except we have
to test the robot y position, and we move it towards front or rear
of the ground. |
|
|
|
|
|
NB : You can find the program in the tutorial files folder. |
|
|
- Run the program and try different robot initial position or direction. |
|
|
The robot counts |
|
Variables |
|
|
|
The data processed by a program are stored in the computer memory. In order to access the data, the programmer associates a variable with the data. |
|
|
* The variable name is defined by the programmer. This name allows the computer to retrieve the data in its memory. The variable name is like a data address in memory. |
|
|
A variable name may contain letters and digits but no space and must begin with a letter. Its maximum length is 32 characters. It must be different from the robot language keywords. |
|
|
*The
variable
value
is the content of the memory location referenced by the name. |
|
Numerical expressions |
|
|
|
Numerical
expressions are calculus formulas They may contain variables,
numbers, parenthesis and operators. The calculus result is an
integer. |
|
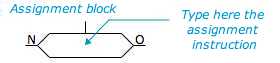
Setting a value to a variable |
|
|
|
Setting
a value to a variable is done with an assignement instruction like
: |
|
|
|
|
|
The
sign = is used in many programming languages for the assignment
instruction. |
|
Using variables in a program |
|
|
|
Now,
you are going to write a program to find haw many steps were done
by the robot. |
|
|
|
|
-
Run the program and click the button "Show variables",
so that you can watch the variable nSteps value changing when the
robot moves. |
|
|
|
Build
a program moving the robot like in previous program but with a
different way of counting the number of steps, using the keyword
DistanceFromWall |
|
|
The robot draws |
|
Loops are usefull |
|
|
|
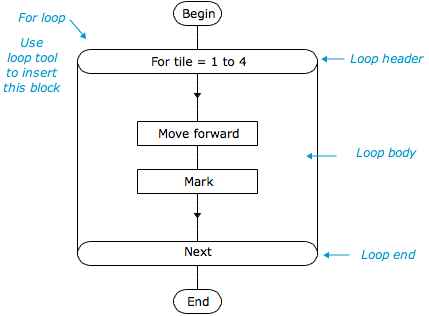
*
In this chapter, you are going to make the robot draw a square
with a side of 5 tiles. To draw a mark on a tile, the robot uses
the instruction Mark . After marking a tile, the robot has to move
and turn if necessary to mark the next tile. The number of marks
to be drawn is 16 : the robot has to move and draw a mark 16 times
and turn 4 times at each square corner. So the program will
contain at least 36 blocks. This is really too much, most of the
blocks are the same because the same action has to be repeated
many times. And in case you want to draw a larger square, you have
to change the whole program. So the solution is to use loops to
repeat a part of the program. |
|
|
*
Before starting programming : |
|
Drawing one side of a square |
|
|
|
Now,
you are going to write a subroutine to draw one side of the
square. |
|
|
|
|
|
*
The
loop header contains
the instruction : For tile = 1 to 4 |
|
|
Loop
header and loop end blocks are rounded because they behave like
begin and end blocks : they show the begin and the end of the
flowchart to be repeated. |
|
Drawing a square |
|
|
|
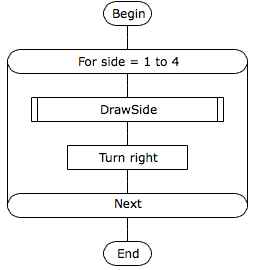
In
order to draw a square,we have to draw a side and turn, this being
repeated 4 times. So we use again a loop to draw the square. |
|
|
|
|
- run the program and verify the robot draws a square. |
|
|
|
Draw
a rectangle : |
|
|
The robot plays ball |
|
How to get the ball |
|
|
|
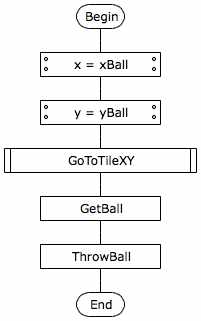
* In this chapter, you are going to write a program to make the robot find the ball and throw it. First it is necessary to know how to make the robot go to a tile, the one where the ball is. (Ball programming is intoduced in next paragraph). *
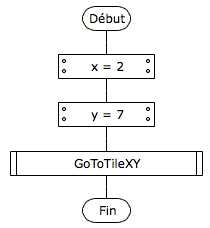
So you are going to build a subroutine named GoToTileXY to make
the robot go to the tile with coodinates (x, y). x and y are two
variables set to proper values before the subroutine call. *
Before beginning programming : *
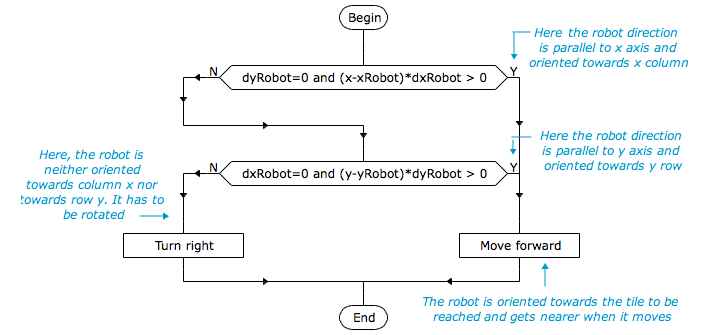
GoTowardsXY subroutine |
|
|
|
|
|
Logical
conditions to test the robot direction : - Click the button "Verify flowchart" to ensure your flowchart is correct. *Subroutine
GoToTileXY |
|
|
|
|
|
*
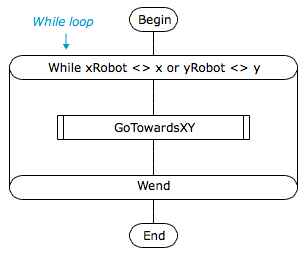
The While loop block has the same shape as the For loop block. The
loop header contains the instruction While beginning with the
keyword While followed by a logical condition (as in test
block) * In subroutine GoToTileXY, the loop body, that is the subroutine GoTowardsXY, is executed while the condition xRobot <> x or yRobot <> y returns the value true ; xRobot <> x is a logical expression comparing the values of xRobot and x, its result is true if the values of xRobot and x are different ; the expression yRobot <> y is true if yRobot is different from y ; so, the condition xRobot <> x or yRobot <> y is true if the robot isn't on tile x,y. *
Testing subroutine GoToTileXY : |
|
|
|
|
How to program the ball |
|
|
|
*The
ball is displayed on the ground only if the program contains a
keyword related to the ball. *
The keywords xBall and yBall give the ball position on the ground.
*
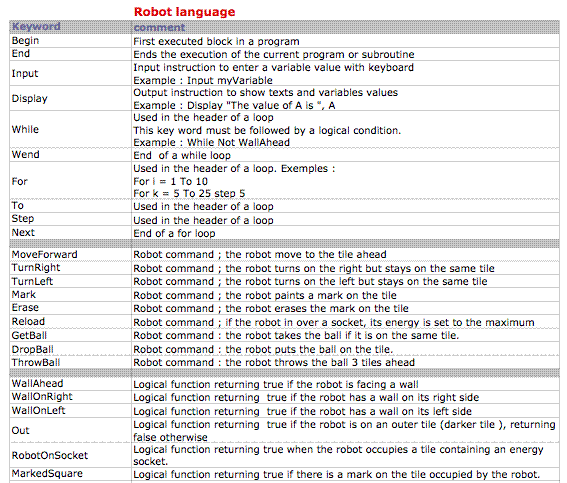
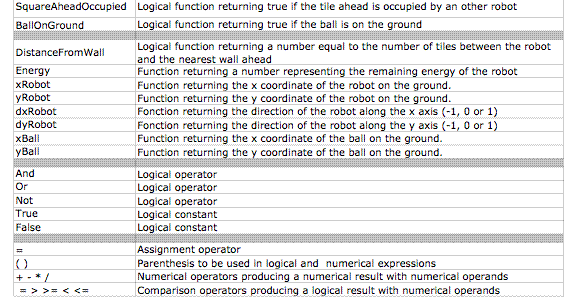
Ball commands : GetBall, DropBall, ThrowBall |
|
|
|
|
|
GetBall
: if the robot is on the same tile as the ball, it takes the
ball. |
|
One robot plays ball |
|
|
|
*
Before beginning : *
Now you are going to write a program to make the robot find the
ball and throw it. |
|
|
|
|
|
- run the program and enjoy... |
|
How to program several robots |
|
|
|
*
At level 6, it is possible to execute several robot programs at
the same time on the same ground. * The open programs are parts of the current project. You can see a list of the project programs by opening the project window with the Window > Project menu. With this window, you can display or hide or remove programs. At level 6, when you close a program window, the program remains in the project and is still executed even if it is not displayed. If you don't want the program to be executed you have to remove it from the project. *
At level 6, it is possible to make the robots play games together.
Here the robots will play basket-ball game. |
|
Basket-ball game |
|
|
|
*
Run the previous program |
|
|
|
|
|
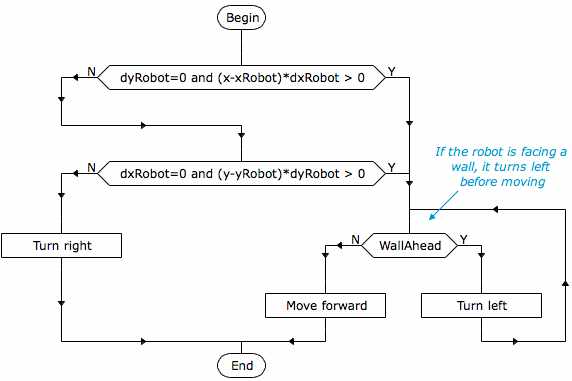
- run the program : it's better, the robot doesn't crash against walls, but there is still a problem : it throws the ball anywhere in the ground ! *
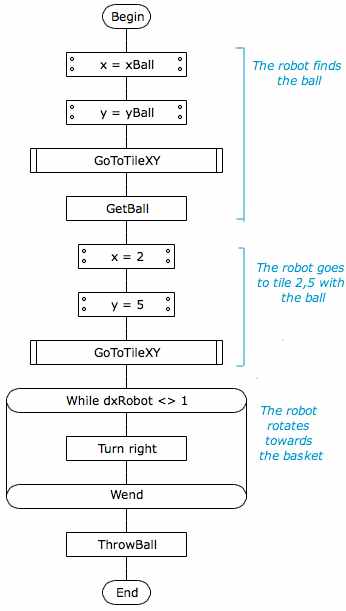
To score a point, the robot has to throw the ball into the basket.
When it throws the ball, the ball goes three tiles ahead, so
before throwing the ball, the robot has to go to a position three
tiles away from the basket, for instance to the tile 2,5, then it
has to turn itself in direction of the basket. |
|
|
|
|
|
- run the program, now the robot scores points.... |
|
|
*
Basket game with several robots : |